Negative walls: where price accelerates
Identify N1/N2 negative walls and use them as stop-loss levels — never as support or resistance.
In the previous lesson you learned that big green bars (P1/P2) act as magnets — they pull price back. This lesson covers the dangerous twin on the other side: big red bars.
These are negative walls. And the rule for trading them is the opposite of what most traders assume.
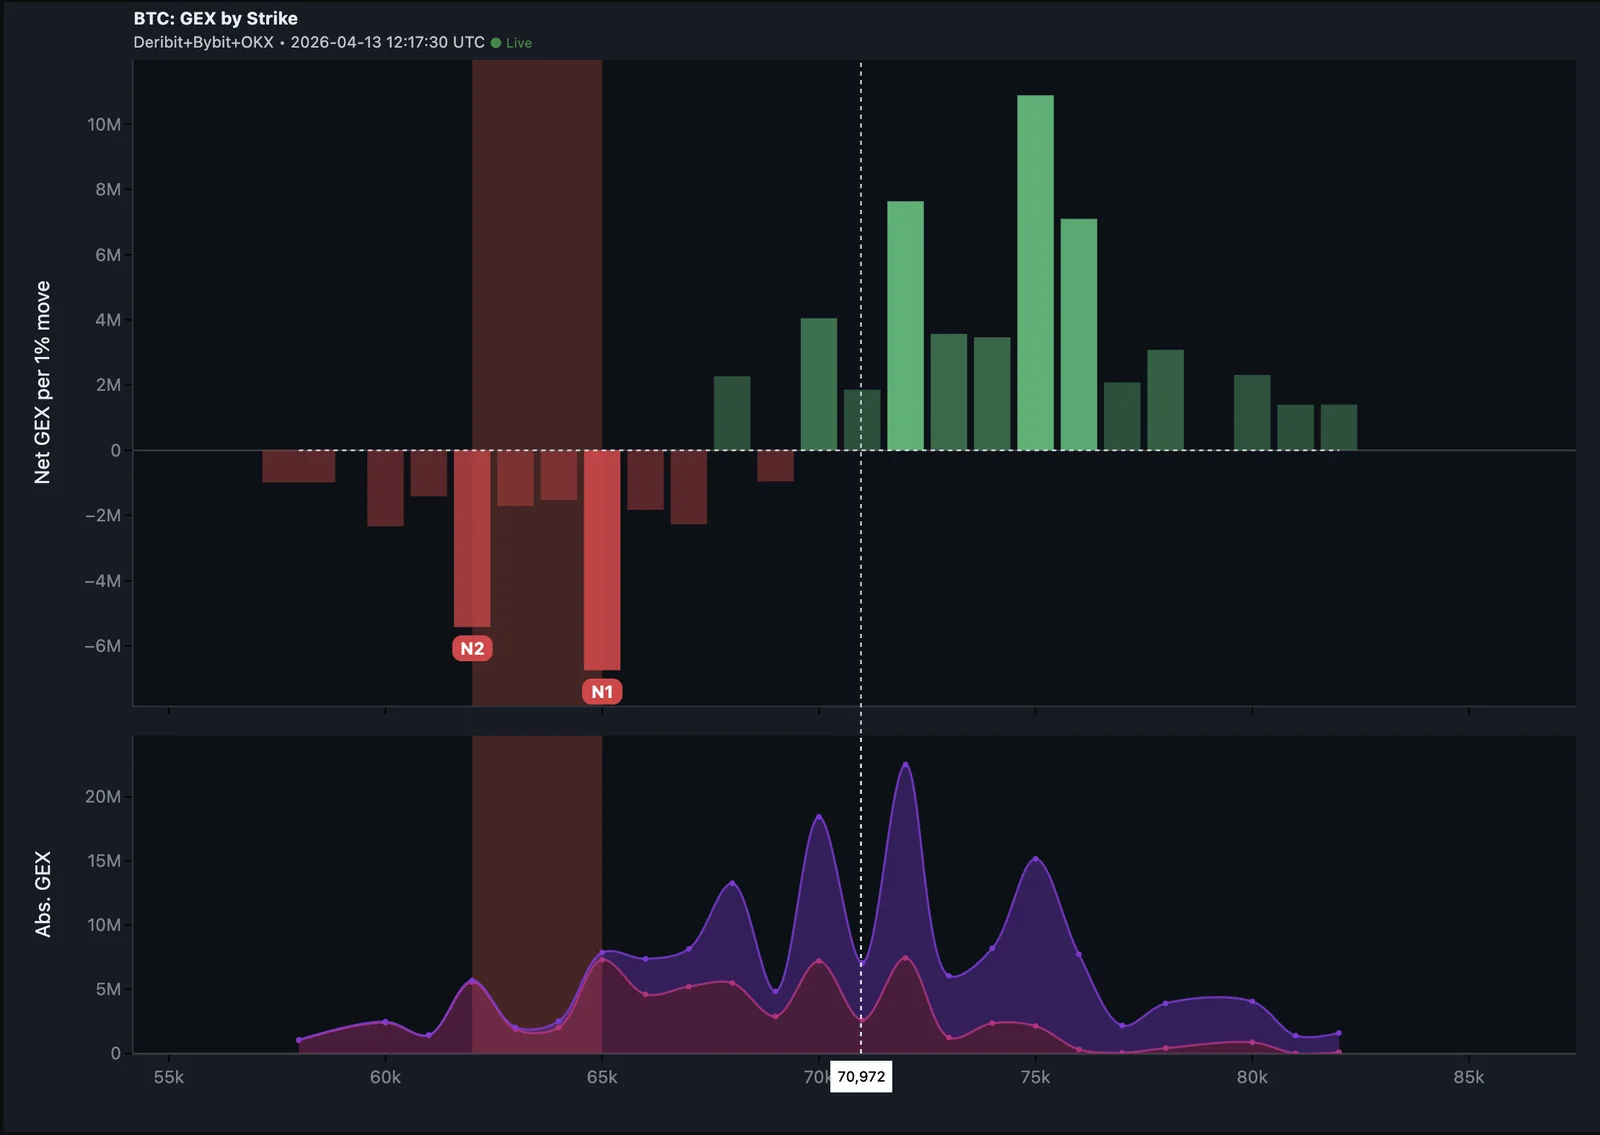
What N1 and N2 are
N1 and N2 are the two largest negative gamma peaks on the GEX chart. They sit in the red zone — below the Flip point.
The opposite-rule
Here's the key mental model: at P1/P2, price stalls. At N1/N2, price accelerates.
Why the difference? At positive walls, structural pressure dampens moves — small moves get faded, large moves snap back. At negative walls, structural pressure amplifies moves — small moves get pushed further, large moves break out.
Treat the bars the same and you'll get the trade backwards every time.
| Wall type | Bar color | Behavior | What to do |
|---|---|---|---|
| P1 / P2 (positive) | Green | Stalls, mean-reverts | Take-profit, mean-reversion entry |
| N1 / N2 (negative) | Red | Accelerates, breaks | Stop-loss, breakout target |
What happens when price reaches N1
Three things, often in this order:
- Volatility expands — bid-ask spreads widen, candles enlarge
- Stops trigger on each side — momentum traders pile in
- Price continues in the direction of the breach, often further than expected
This is structural, not psychological. The market structure at N1 is set up to feed the move. There's no force fading it.
In a perp context, this is where liquidations cluster. A pre-existing liquidation cluster sitting on top of N1 makes the cascade larger and faster.
How to use N1/N2 in your trading
As a stop-loss level: If you're long above N1, your stop goes below N1, not at it. The level is the trigger zone, not the bottom of the move. Place your stop where you accept that the cascade has started — which is on the far side of N1.
As a breakout target (don't fade): If price is approaching N1 from above with momentum and volume, don't fade the move. The structure is against you. Either step aside or follow the breakout with a tight risk.
Never as support: A long entry at N1 expecting bounce is the worst trade in the book. You're standing in the path of the move, not catching the dip.
When N1 sits near the Flip point
This is a setup worth watching. If N1 is right next to the Flip point, the regime change and the negative wall combine into a single trigger zone. A break of the Flip with N1 below tends to be the start of a directional move, not a wick.
Pre-trade plan in this setup:
- If price is above the Flip, you're sticky — but a break down is high-risk
- Reduce size, tighten stops, or stand aside if price approaches the Flip
- A clean break of Flip + N1 = volatility regime, plan for a multi-percent move
Quick mnemonic
The cleanest way to remember this:
Green bars stop price. Red bars start moves.
Anything more complicated than that and you'll talk yourself out of the trade. Use the right side of the chart for stops, the left side for targets, and never confuse the two.
Next lesson: Absolute walls (A1/A2) — a different category of level that adds a third coordinate to the GEX map.
Check your understanding
BTC is at $93,000. N1 is at $92,500. You're long. Is N1 a good level to buy a dip?
No. N1 is a negative wall — a volatility amplification zone, not support. If price dips into N1, expect the move to accelerate, not reverse. Treat N1 as a stop-loss level, not a re-entry.
What's the most common mistake traders make with N1/N2?
Treating them as support/resistance. They look like big bars on the chart, but they behave the opposite way of P1/P2. Price doesn't stall at negative walls — it speeds up through them.
Price has been ranging quietly above the Flip in a sticky regime. You notice N1 is just below the Flip, $1,500 down. What's the implication?
If price breaks the Flip and reaches N1, you're likely to see a volatility cascade. The combination of regime change (sticky → jumpy) plus a negative wall below makes a clean break dangerous. Plan for an asymmetric move down rather than a slow grind.